
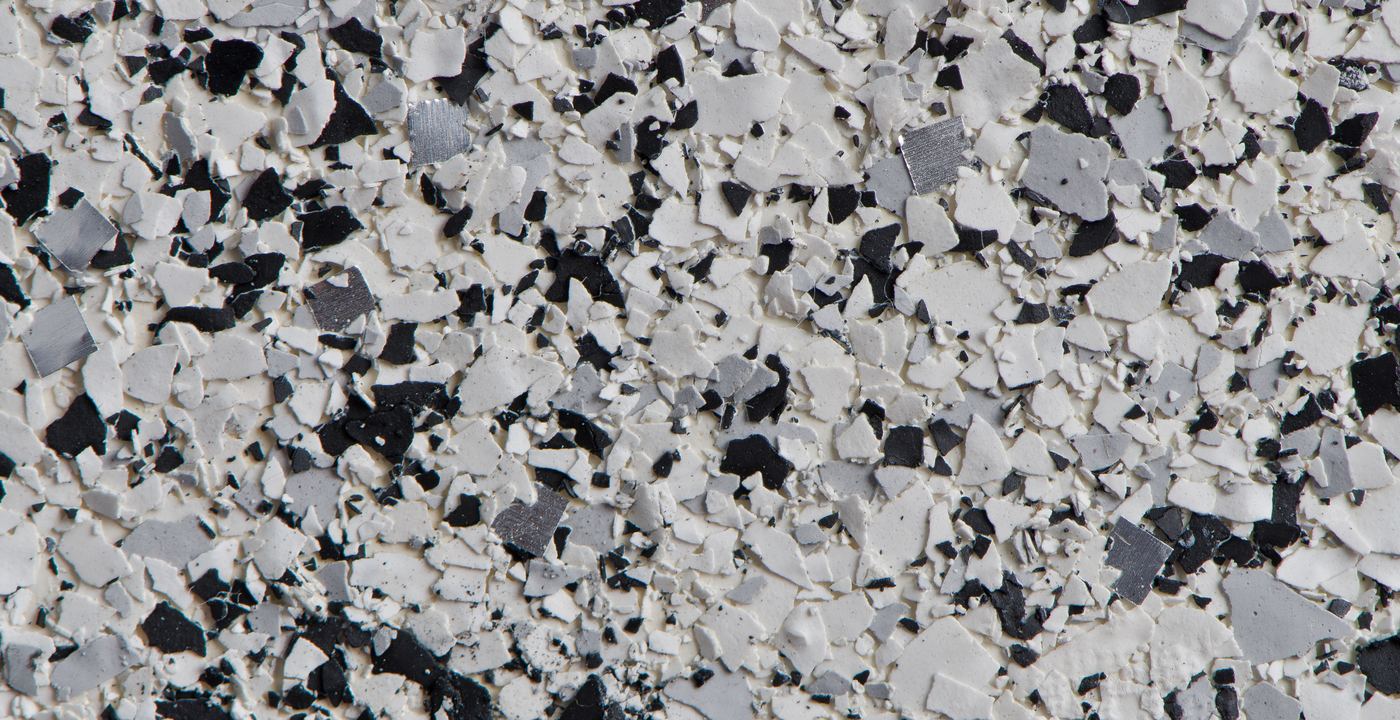
1/4" chips
The largest of the common sizes. A bold, terrazzo-like look with visible individual chips, stronger texture and the most forgiveness over surface flaws.
Service
Garage floor epoxy is a stack of layers, not a coat of paint.
Overview
Most garage floor epoxy installed today is a flake system: the garage-specific branch of our epoxy flooring options. It is a prepared slab plus four working parts: a primer where the concrete needs one, a pigmented base coat, colored vinyl chips thrown into the wet base, and one or more clear topcoats that seal the chips in. The chips are decoration and texture. The base and the clear coat do the structural work. When people search for an "epoxy flake garage floor" they usually mean this whole stack, even though the clear coat on top is often polyaspartic or urethane rather than epoxy. Other names for the same floor are chip floor, broadcast floor and decorative flake.
The look is the speckled finish seen in showrooms and well-kept garages, and it is popular for practical reasons. A full broadcast hides patched cracks, old oil staining, tire marks and the blotchy color of an aging slab. It gives the surface a grain that helps with traction. Because the chips are sealed under a clear film, a hose or mop cleans the floor without scrubbing into open pores, which is why a flake floor looks better for longer than a plain painted slab that shows every stain.
What decides whether the floor is still bonded years from now is mostly hidden: how the concrete was ground, whether moisture was measured, how the cracks and joints were repaired, and which topcoat chemistry sits under the tires. Most pages about flake floors focus on the product. This one follows the slab, because that is where garage floors in the DMV fail. It covers the layers, the topcoat debate, one-day versus two-day installs, cure behavior, local conditions, maintenance, and what to ask before you sign anything.
Every layer has a job. Thin or skip one and the floor does not wear evenly; it fails at the weakest point, usually the door threshold, the edges and the tire paths.
The slab is ground with diamond tooling to open the pores and remove laitance, old sealers and contamination. Cracks are chased and filled, spalls and pop-outs are patched, and joints are treated as the written scope describes. This is where the bond is made, so it is where most of the labor goes.
Moisture is measured before material is mixed, and the primer is chosen from the result. On a dry slab a penetrating epoxy primer wets into the ground surface. On a slab with elevated vapor, a moisture-mitigating primer, the product category defined by ASTM F3010, goes down instead.
A tinted epoxy or polyaspartic base is applied at a measured thickness. Its color shows between the chips, so it is matched to the blend. The base also builds film and holds the chips in place while they are thrown.
While the base is wet, chips are thrown by hand into the air so they land flat and even. A full broadcast continues until the resin is completely covered. A partial broadcast stops short and leaves base color showing through.
After the base has set enough, loose chips are scraped and vacuumed off. Full broadcast floors usually need firm scraping, and sometimes light sanding, so no chip edges stand up and catch the clear coat.
A first clear coat fills the gaps between chips and locks them down. With a full broadcast the surface is thick with chips, so many floors take more than one clear coat to fill the texture and leave a smooth, sealed finish.
A UV-stable, abrasion-resistant clear finishes the floor. This is the layer that tires, brine, oil, bike stands and jack feet actually touch, so its chemistry and film thickness matter more than any other single choice.
Foot traffic comes first, then vehicles, then full chemical exposure. The windows depend on the products, temperature and humidity, so they should be written into your estimate rather than promised from memory.
Illustration, not to scale. Layer names follow the install steps above.
The words get used loosely, and one trade name can hide several chemistries. These are general tendencies; the data sheet for the exact product governs.
| Property | Epoxy (two-part) | Polyaspartic | Polyurea (fast-set) |
|---|---|---|---|
| Usual role in a flake floor | Primer, base and build coats | Clear topcoat, sometimes the base | Base or topcoat in fast systems |
| Behavior in sunlight | Tends to amber and chalk on exposure | Aliphatic and UV-stable; stays clear | Depends on the product; aliphatic grades hold color |
| Hot-tire pickup | Depends on cure, film and prep; thin or undercured coats are the usual offenders | Generally strong at proper thickness over a sound bond | Generally strong; varies by formulation |
| Working time after mixing | Long, which suits hand work | Short; often tens of minutes, less in heat and humidity | Very short |
| Return to service | Slowest; several days before vehicles | Often foot traffic in hours, vehicles in one to three days | Fast |
| Sensitivity during install | Cool slabs and humidity can cause amine blush | Humidity, dew point and damp slabs all affect it | Moisture and dew point sensitive |
| Film per coat | High; builds well | Thinner per coat, often applied in more than one | Varies widely |
| Where it fits best | Under the flake | Over the flake | When a very short schedule drives the choice |
Epoxy is a strong adhesive and a good builder. Polyaspartic is a clear, UV-stable shield. Many floors use each where it performs best.
Hot-tire pickup is the failure homeowners worry about most. After a drive, tires carry heat and rubber compounds onto the floor. A coating that is too thin, undercured, contaminated or poorly bonded can soften or release under that load, often in the spot where the front wheels stop and turn. Once one patch lets go, the film around it tends to follow.
It is tempting to blame one product family, but the honest picture is wider. Resin, preparation, cure, film thickness, contamination, moisture and the tires themselves all play a part, and careful technical write-ups avoid claiming any one family is immune. What can fairly be said is that an exposed epoxy clear coat is usually the weaker choice under tires and in sunlight, while a polyaspartic or polyurethane clear over a well-bonded base is the common garage specification today.
There is a caution on the other side. A polyaspartic topcoat is not a cure for a poor slab. Homeowner reports of polyaspartic topcoats flaking within a year, including the Garage Journal threads we reviewed, trace back to preparation more often than to chemistry. Chemistry sets the ceiling. Preparation sets the floor.
Chip choice changes the look, the texture and how much the floor hides. A sample board in your own garage light beats any photo.
The largest of the common sizes. A bold, terrazzo-like look with visible individual chips, stronger texture and the most forgiveness over surface flaws.
The middle size and a very common garage choice. Balanced speckle that blends easily and feathers cleanly at walls and cabinets.
The finest of the three. Reads as a smooth granite color from a few feet away and feels less textured, but it hides less surface variation.
Chips are added until the resin is completely covered. Most hiding power, most uniform color and most texture. Usually needs scraping and extra clear coat to flatten the surface.
Chips are scattered at lower density so base color shows through. A cleaner, more modern look, but it hides less and can reveal patches.
Blends mix chip colors and sizes. Darker blends hide dirt and tire marks. Light blends brighten a dim garage but show oil and road grime sooner.
If you remember one section of this page, make it this one. A coating is only as strong as its grip on the concrete.
Old paint, sealers, adhesive and failed kit coatings come off down to sound concrete. A new coating over a failed one stacks a fresh bond on an old failure.
Diamond grinding opens the surface and gives the coating something to grip. Profile is described on the ICRI CSP scale, from 1 (nearly smooth) to 10. Thin-film coatings generally call for CSP 1 to 3 and thicker build systems for 3 to 5, and the product data sheet states the target. Acid etching sits at the smooth end of that scale and is the prep method forum posters most often blame for peeling, so we grind every slab and never etch.
Cracks are opened slightly so repair material reaches depth, then filled flush. A hairline shrinkage crack is a different problem from a crack that is still moving, and an honest installer will tell you which one you have.
Control joints are cleaned and filled with a semi-rigid material when they are not meant to move. Chipped edges, pop-outs and pitted areas are patched before any coating goes down.
Two standard methods are used. ASTM F2170 measures relative humidity inside the slab with probes. ASTM F1869 uses calcium chloride to report vapor emission from roughly the top inch of the surface. Each coating product states its own limits, and some mitigation primers are rated to bond at readings as high as 99 percent RH, so the skill is matching the reading to the product.
A new slab has to have cured long enough for the chosen product. One mitigation primer data sheet, for example, calls for a minimum concrete age of three days. Temperature and dew point on install day matter too, because coatings go on only within the window the data sheet allows.
Grinding dust is vacuumed thoroughly and the slab is wiped down right before priming. Dust left on the surface becomes a weak powder layer under the base coat.
Slabs in the older housing around Arlington, Alexandria, Falls Church and close-in Fairfax are the ones we are most often asked about when a coating has failed. Modern building practice puts polyethylene sheeting under a slab, and ACI guidance cited in trade sources calls for at least 10 mil. On an older garage nobody can confirm what is underneath without opening the slab, so it has to be treated as a question, not an assumption.
Concrete on soil lets ground moisture move up through the slab as vapor, especially in humid months. A sealed, low-permeability coating traps it. The result is blisters, bubbles and soft peeling areas that show up weeks or months later, often in patches. One Garage Journal poster in our local research cut open a bubble on a roughly 50-year-old house two months after a metallic epoxy install and found water. Old oil in the pores, slick troweled surfaces and residue from etching add to the problem.
The fix is not a thicker coat. It is a moisture test before the product is chosen, diamond grinding, and a moisture-mitigating primer where the readings call for it. No coating fixes active water intrusion, so a garage with a leak, a drainage problem or standing water needs that solved first. If readings are beyond what the available primers allow, the honest answer may be a breathable alternative. That conversation belongs before anyone mixes material.
Less vapor moves up through the concrete, so there is less to push on the coating.
Vapor keeps rising. A sealed, low-permeability coating traps it, and the result can be bubbles, blisters and peeling weeks or months later.
Simplified illustration. A moisture test before coating shows which case a real slab is closer to.
Both can produce a good floor and both can fail. Contractors on each side sell hard against the other, so here is the plain version.
| Factor | One-day system | Two-day system |
|---|---|---|
| Typical layout | Grind, fast-curing base, flake and clear in a single visit | Day one: grind, prime, base, flake. Day two: scrape and clear after an overnight cure |
| Film build | Thinner layers that cure quickly | A thicker base with time to cure before the clear |
| Damp slabs | Workable only if a mitigation step is built in and the product is rated for the reading | Easier to add a mitigation primer or extra base layer |
| Weather and dew point | Fast products leave little time to correct for humidity or a cold slab | Longer windows are more forgiving |
| Time on site | Shortest, with vehicles often back within days | About one extra day |
| Where it works well | Dry, sound, well-ground slabs and tight schedules | Repairs, older slabs, cold or humid weather, higher film build |
| Honest warning | Speed can turn into skipped scraping, a single thin clear or rushed prep | An extra day does not make up for poor grinding |
Claims that one approach always fails are marketing. A rushed job fails, and so does an unprepared slab. Ask what is in each layer and how long the base is allowed to cure before the clear.
Typical layouts only. Actual schedules depend on the product, slab and weather.
A cove base carries the coating a few inches up the wall and rounds the corner into a smooth curve. It makes washing easier, stops water and brine from creeping behind the floor edge, and finishes cabinets and walls neatly. It is standard in commercial restrooms and a good upgrade in a garage that gets rinsed in winter.
Slip resistance comes from the chips themselves, from an anti-slip aggregate mixed into or broadcast over the clear coat, and from the sheen. A full broadcast has natural grain. Garages with a sloped apron, pool houses, walk-out basements and restrooms usually need added aggregate. In commercial work, wet slip resistance is commonly checked under ANSI A326.3, where a dynamic coefficient of friction above 0.42 is the usual benchmark for interior wet areas. The standard describes the test as a way to compare surfaces, not a prediction that anyone will or will not slip, so ask for a measured value on the actual finish.
Every texture is a trade-off. More grit means more grip and more places for dirt to settle. A smooth clear cleans easily and is slicker wet. Match the finish to how the space is used rather than accepting one default.
Garages here do not behave like garages in Phoenix or Seattle. Climate and housing stock should drive the spec.
VDOT pretreats interstates and primary roads with a salt brine of about 23 percent salt and stockpiles large amounts of salt each winter. Tires carry that slurry into the garage. A sealed floor lets it rinse away, but salt left to dry in crusts at the tire line is worth hosing off.
The DC region has a humid subtropical climate with summer averages in the high 70s to low 80s Fahrenheit. High dew points affect both the slab and the install, from amine blush on epoxy to condensation on a cool floor.
Cold snaps and thaws move concrete. Joints and cracks open and close, so joint treatment and flexible fill matter for how the floor looks years later.
One-car and tandem garages in places like Kingstowne, Lorton and Burke are tight to work in. Check your HOA or architectural committee rules and any condo declaration before work, and remember that permits are still the homeowner's responsibility.
Mid-century garages may have patched cracks, oil-saturated concrete and no vapor barrier you can confirm. They need testing and repair before any color conversation.
Fresh slabs in newer Loudoun and Prince William communities have to cure before coating, and many are power-troweled smooth, which calls for proper grinding.
Cure times vary by product, thickness, temperature and humidity, so treat these as general ranges. Data sheets for polyaspartic clears commonly list working time of roughly 10 to 80 minutes after mixing, foot traffic in a few hours, and vehicle traffic somewhere between 24 hours and three days, with full cure taking several days. Most figures are quoted near 73 to 77 degrees Fahrenheit and moderate humidity, so a cold or damp garage runs slower. Epoxy-based systems with epoxy clears take longer before vehicles and before heavy or chemical exposure.
Application windows are limited too. Many data sheets set a temperature range around 40 to 90 degrees Fahrenheit, a humidity ceiling and a margin of about 5 degrees between the surface and the dew point. That is why a good installer checks the slab, not just the air.
Tack-free is not fully cured. Keep the floor clear of tool chests, bike stands and standing water until the documented vehicle window passes, and ventilate the garage. Some product sheets note odor lasting a day or two depending on airflow, and installers should use the respiratory protection that polyaspartic and polyurea materials call for.
General ranges quoted on this page; the data sheet for the installed product governs. Cold slabs stretch every stage.
A flake floor is easy to keep clean. Dust mop or sweep, then mop with warm water and a neutral cleaner. In winter, rinse salt and slush toward the door before it dries. Use a soft deck brush on stubborn spots, never a stiff steel brush.
Avoid solvents, acidic cleaners and abrasive pads. Wipe up brake fluid, gasoline and battery acid promptly. Put felt pads under jack stands and use wide, soft casters for heavy tool chests. Rubber-backed mats can trap moisture and stain some coatings, so lift them now and then.
Expect the clear coat to dull slowly in the tire paths and near the door. A recoat of the clear can refresh the finish without redoing the floor, provided the base underneath is still sound.
Every garage floor choice involves trade-offs. Here is how they compare in general terms.
| Option | Appearance | Durability | Moisture and salt | Main drawback |
|---|---|---|---|---|
| Professional flake system | Decorative, hides flaws | High when ground, tested and topcoated properly | Seals out brine; vapor needs a plan on damp slabs | Depends on prep; costs more than a kit |
| Hardware-store paint or kit | Thin color, sometimes with a few chips | Often lifts under hot tires; low film build | Peels if the slab is damp or only etched | Weak bond and thin film |
| Interlocking tiles | Many patterns, replaceable sections | Good wear; tiles can shift | Passes moisture but can trap it beneath | Seams collect dirt and salt |
| Sealed bare concrete | Plain gray, shows stains | Moderate | Breathable and forgiving on damp slabs | Stains and dusts over time |
| Ground and sealed or polished concrete | Natural, satin to gloss | Good on dry, sound slabs | Breathable options exist | Shows cracks and stains more than flake |
If your slab tests high for moisture, a breathable option may suit better. See grind and seal and polished concrete, or metallic epoxy for a different decorative look.
These show up again and again in forum threads, reviews and complaints.
Etching is quick but unreliable on dense modern concrete and can leave residue. Mechanical grinding is the standard for a durable bond.
Coating over a slab that is releasing vapor is a leading cause of bubbles and peeling in older garages.
Cracks telegraph through and reopen. Repair should be itemized in the written scope.
A beautiful blend over a poor bond is a short investment. Compare scope, prep and clear coat before comparing chips.
Old kit coatings and peeling layers must come off, or the new floor inherits the failure.
Phrases like "full system" or "premium coating" mean little without layer-by-layer detail and a written prep description.
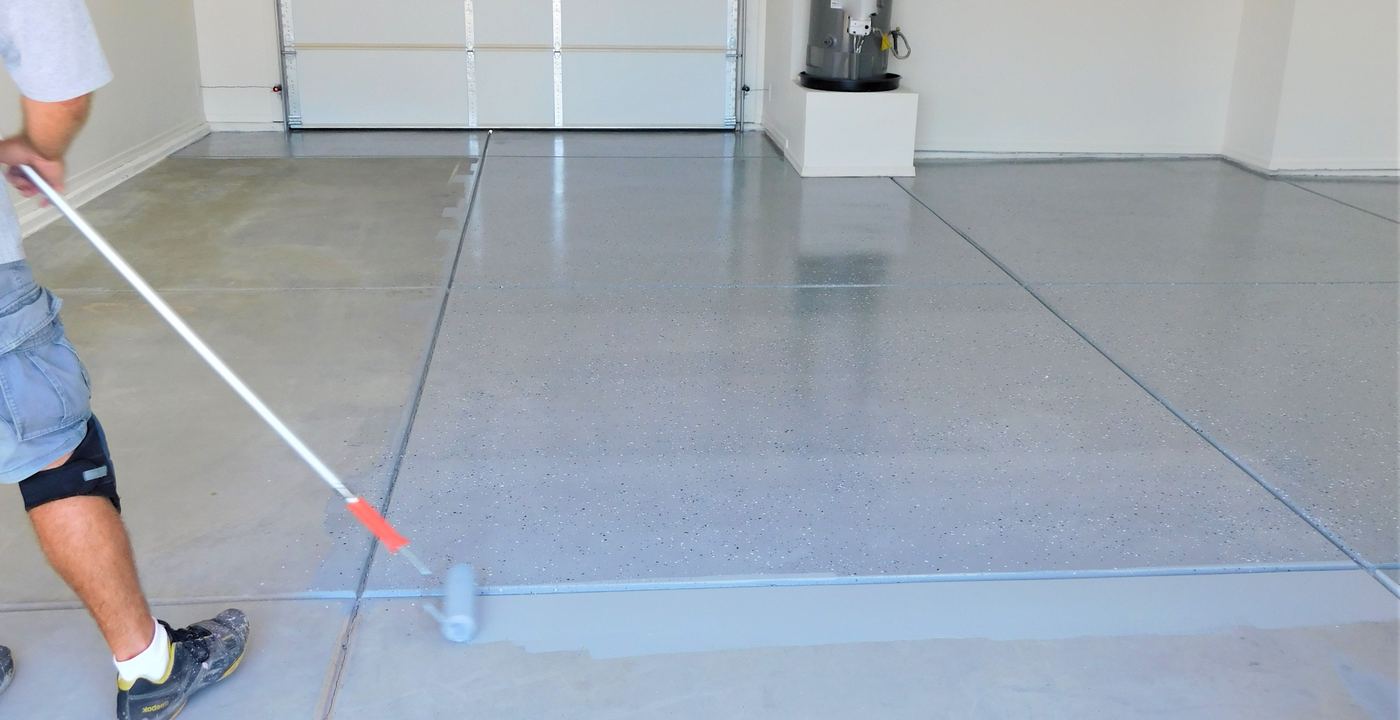
There is no honest blanket figure for a garage, because the slab drives the work as much as the footprint. These are the factors that move a project, and they belong in any estimate conversation.
A short list of questions separates installers who sell a floor from installers who build one. Ask by phone or email and expect specific, written answers. You can also send photos for a free estimate and compare the answers you get.
Questions
It is a layered coating system. The concrete is ground, primed and covered with a pigmented base coat, colored vinyl chips are broadcast into the wet base, and one or more clear topcoats seal everything in. The clear may be epoxy, polyaspartic or urethane, so "epoxy flake" describes the look and method more than one chemical.
For the top layer, usually yes. Polyaspartic is UV-stable, cures quickly and holds up under tires when applied at proper thickness. Epoxy is excellent underneath because it bonds well and builds film. Many floors use both, and the more important question is how the slab was prepared and tested.
Most peeling comes from the slab and the prep: unground concrete, contamination, a missed recoat window, thin film, or moisture vapor moving up through the slab. In older DMV garages without a vapor barrier you can confirm, moisture is a leading suspect.
A well-bonded floor with a polyaspartic or polyurethane clear at proper thickness resists hot tires well. Thin kit coatings and exposed epoxy clears are the usual places hot-tire pickup starts. Prep, cure, film and contamination matter as much as chemistry.
Many garages take one to two days on site depending on size, repairs and system design. A one-day system finishes everything in a visit. A two-day system lets the base cure overnight before the clear. Ask for the written schedule and the return-to-service windows.
With fast-curing polyaspartic clears, foot traffic is often possible within hours to a day, and vehicles are commonly allowed after about one to three days. Epoxy-heavy systems take longer. The exact window depends on temperature and products, and it should be written into your estimate.
Many garages use 1/8" chips at full broadcast for a balance of look and texture. Large 1/4" chips hide the most and look boldest. Fine 1/16" chips look smoother but hide less. Full broadcast covers the resin completely; partial lets base color show.
Full broadcast has natural grain, and aggregate in the clear adds more. Wet entries, sloped aprons and restrooms usually need aggregate. In commercial settings, ANSI A326.3 wet DCOF testing is the usual benchmark, so ask for a measured value instead of a verbal promise.
Not on top of it. The failed coating is ground off to sound concrete, repairs are made, moisture is tested and a new system goes on a clean surface. Layering over a weak coating repeats the failure.
A sealed flake floor is built to resist winter brine. Salt and slush sit on the topcoat instead of soaking into the concrete and rinse off with water. Rinse regularly so salt does not dry into crusty lines at the tire path.
Sometimes, but only after testing. Moisture-mitigating primers exist for elevated readings, and each has its own limits. No coating fixes active water intrusion, so leaks and drainage come first. If readings are extreme, a breathable system may fit better.
Sweep, then mop with warm water and a neutral cleaner. Rinse winter salt, squeegee standing water and avoid solvents, acidic cleaners and steel brushes. Use pads under jack stands and check under rubber mats now and then.
Tell us about your space. We'll recommend the right system and send a free estimate.